AutoFix
User's Manual
Table of Contents
- Introduction
- About this manual
- Installing and opening
AutoFix
- Installing AutoFix
- Opening AutoFix
- A simple example: How to work with
AutoFix
- The example project
and fault
- Debugging
the example fault using AutoFix
- The AutoFix tool
- The Settings panel
- The Faults panel
- The Fixes panel
- The Output panel
- Copying and License
AutoFix is a tool for automatic detection and correction of faults in the
Eiffel programming language. The main goal of AutoFix is to automate as
much as possible the process of finding and correcting program faults. To
this end, AutoFix employs the AutoTest testing tool to automatically
discover faults and implements carefully devised techniques to
automatically suggest fixes to those faults.
AutoFix itself is implemented in Eiffel, and has been integrated into the
Eiffel Verification Environment (EVE) for ease of use. Being part of
EVE, the tool not only provides a means to debug programs with less
effort, but also serves as a central location for the programmers to
review the faults and examine the candidate fixes. When a programmer
decides a fix is proper, i.e. it corrects the original fault while not
introducing any new fault, she could apply the fix from within the tool
--- in such cases the effort to debug a fault is greatly reduced to not
much more than a few mouse-button clicks.
This manual gives a brief yet complete description of AutoFix from the
user's point of view. Technical details like how AutoFix synthesizes and
validates fixes automatically can be found in the publications listed on
the project web page at http://se.inf.ethz.ch/research/autofix/.
AutoFix is an integrated part of EVE. For Windows users, an installation
package of the latest EVE is updated regularly at http://se.inf.ethz.ch/research/eve/builds/.
For users of other operating systems, or those who would like to compile
EVE from the source, please follow the instructions at https://trac.inf.ethz.ch/trac/meyer/eve/wiki
to build EVE.
Executing the EVE executable from the command line with argument " -gui"
will launch EVE with GUI. If the AutoFix tool is not open when EVE is
running, click on View --> Tools --> AutoFix to open the tool panel.
In case no project is currently opened in EVE, the AutoFix tool panel is
in disabled state (and all GUI elements are grayed out).
To demonstrate how to use AutoFix for automatic program fixing, this
section presents a simple Eiffel project with a known fault and describes
a typical AutoFix session. The complete description of the AutoFix
settings, views and functionalities comes in the following section.
The example project is available at here.
It contains three files and one directory:
- project.ecf: Configuration file of the project.
- application.e: The root class of the project.
- my_list.e: An Eiffel class implementing a list data
structure.
- override: An override cluster, classes in which will
override classes in other clusters with the same name. Override clusters
are set in the project configuration file.
The class MY_LIST contains, however, a fault, replicated
from a real world fault in the EiffelBase library. Listing 1 shows the
code snippets relevant to the fault.
Arrayed lists are numbered from index 1 to index count (an
attribute denoting the list length), and include an internal cursor
that may point to any element of the list. Routine duplicate
from class MY_LIST takes a single integer argument n,
which denotes the number of elements to be copied; called on a MY_LIST
object, it returns a new instance of MY_LIST with at most n
elements copied from its storage list starting from the
position pointed to by cursor. For example, given a MY_LIST
object with elements <A, B, C, D> and its cursor
pointing to element B, calling duplicate (3)
on the list returns a fresh list with elements <B, C, D>
in this order.
The implementation of duplicate is straightforward: it
first creates a fresh MY_LIST object Result (line
23 in Listing 1) then iteratively copies at most n elements
from the current list into Result and returns the list
attached to Result (omitted from the Listing). The call to
the creation procedure (constructor) make on line 23
allocates space for a list with count elements; this is
certainly sufficient, since Result cannot contain more
elements than the list that is duplicated. However, MY_LIST's
creation procedure make includes a precondition (line 8 in
Listing 1) that only allows allocating lists with space for at least one
element (require a_size > 0). This sets off a bug when duplicate
is called on an empty list: count is 0, and hence
the call on line 23 triggers a violation of make's
precondition. Testing tools such as AutoTest detect this bug automatically
by providing a concrete test case that exposes the discrepancy between
implementation and specification.
Listing 1. Code snippets relevant to the
fault in class MY_LIST.
|
1. class MY_LIST
2.
3. feature
4.
5. make (a_size: INTEGER)
6. --
Allocate list with `a_size' items.
7. require
8.
valid_size: a_size > 0
9. do
10. create
storage.make (a_size)
11. end
12.
13. duplicate (n: INTEGER): MY_LIST [G]
14. -- Copy of
sub-list beginning at current position
15. -- and
having min (`n', count - index + 1) items.
16. require
17.
not_off_unless_after: off implies after
18.
valid_count: n >= 0
19. local
20. idx:
INTEGER
21.
to_be_copied, counter: INTEGER_32
22. do
23. create
Result.make (storage.count)
24. -- Other
code omitted.
25. end
26.
27. storage: ARRAYED_LIST [G]
28. -- Storage
of current. |
29.
class ARRAYED_LIST
30.
31. feature
32.
33. make (n: INTEGER)
34. --
Allocate list with `n' items.
35. --
(`n' may be zero for empty list.)
36. require
37.
valid_number_of_items: n >= 0
|
|
How should we fix this fault? Listing 2 shows three different possible
repairs, and AutoFix can generate completely automatically all of them. An
obvious choice is patching duplicate's implementation as shown in Listing
2a: if count is 0 when duplicate is invoked,
allocate Result with space for one element; this satisfies
make's precondition in all cases; then, MY_LIST's
implementation looks perfectly adequate, whereas the ultimate source of
failure seems to be incorrect or inadequate specification. A
straightforward fix is then adding a precondition to duplicate that
only allows calling it on non-empty lists. Listing 2b shows such a fix,
which strengthens duplicate's precondition thus invalidating
the test case exposing the bug. The strengthening fix has the advantage of
being textually simpler than the implementation fix, and hence also
probably simpler for programmers to understand; last but not least, a look
at MY_LIST.make's implementation would reveal that the
creation procedure's precondition a_size > 0 is
unnecessarily restrictive, since the routine body works as expected also
when executed with a_size = 0. This suggests a fix that
weakens make's precondition as shown in Listing 2c.
Listing 2. Three different fixes to the fault in Listing 1.
class
MY_LIST
feature
duplicate (n: INTEGER): MY_LIST [G]
--
Copy of sub-list beginning at current position
--
and having min (`n', count - index + 1) items.
require
not_off_unless_after: off implies after
valid_count: n >= 0
local
idx:
INTEGER
to_be_copied, counter: INTEGER_32
do
if
storage.count <= 0 then
create Result.make (1)
else
create Result.make (storage.count)
end
--
Other code omitted.
end |
class MY_LIST


              feature


                 duplicate (n: INTEGER): MY_LIST [G]

                         --
              Copy of sub-list beginning at current position

                         --
              and having min (`n', count - index + 1) items.

                     require


              not_off_unless_after: off implies after


              valid_count: n >= 0


                           not
                  is_empty

                      local

                         idx:
              INTEGER


              to_be_copied, counter: INTEGER_32

                     do


              create Result.make (1)

                         --
              Other code omitted.

end |
class MY_LIST


              feature


                  make (a_size: INTEGER)


              -- Allocate list with `a_size' items.


                        require


                  a_size >= 0

                       do


              create storage.make (a_size)

end |
| (a) Patching the implementation. |
(b) Strengthening the specification. |
(c) Weakening the specification. |
The rest of this section describes how to use AutoFix to generate these
fixes automatically.
The easiest way to debug a project is to open the project in EVE, let the
AutoFix tool automatically detect faults and propose candidate fixes, then
go through each fault and fix to identify the proper fixes, and
apply those proper fixes. Particularly this includes the following steps:
- Open and compile the project in EVE by following the instructions at
https://docs.eiffel.com/book/eiffelstudio/compiling-and-executing-system;
Note: AutoFix only runs on projects that can
successfully compile, so you have to correct all syntax errors manually
before using the tool.
- Open the AutoFix tool;
- Add class
MY_LIST to Groups of classes to
AutoFix, and leave the default values for other settings
unchanged;
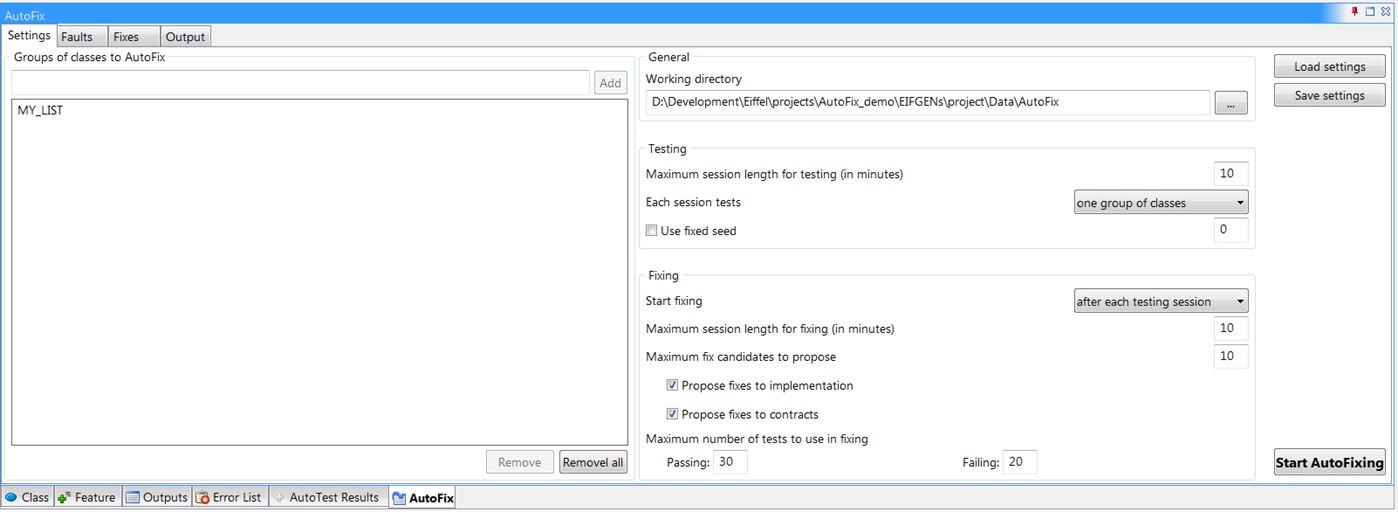
Figure 1. The default settings.
- Click on Start AutoFixing on the Settings panel to
start automatic debugging, which involves first testing
MY_LIST
for 10 minutes and then fixing each fault that is found during testing.
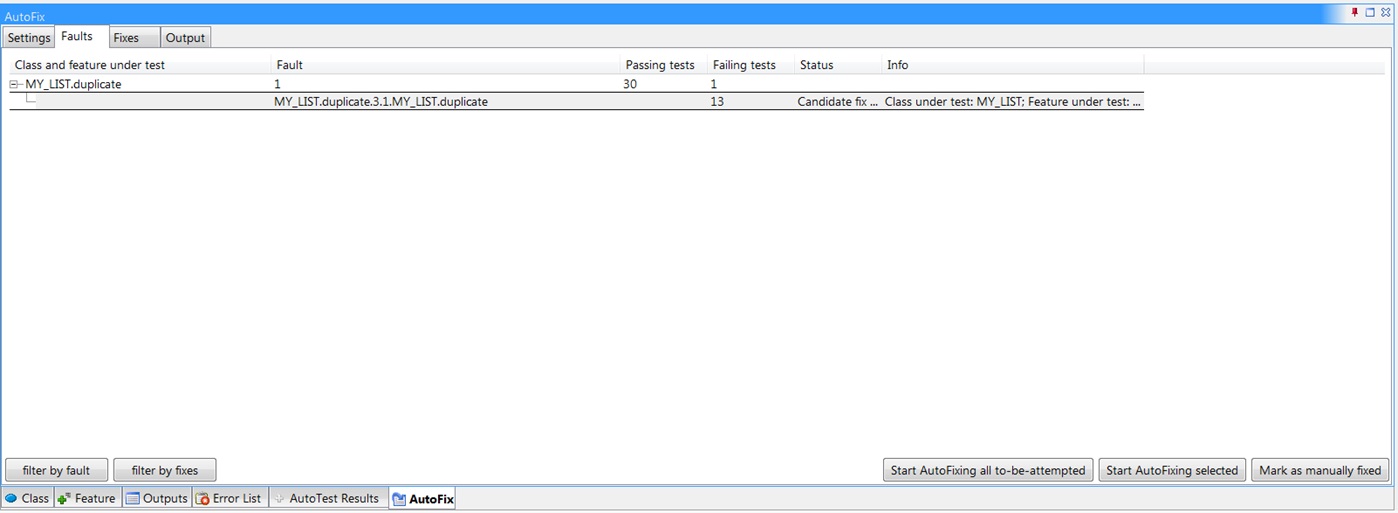
- During debugging, all the faults detected by AutoTest will be listed
on-the-fly on the Faults panel, together with the IDs
of the faults, the numbers of passing and failing tests related to each
fault, etc. For example, Figure 2 shows that one fault has been found
during testing
MY_LIST.duplicate, and that there are 6
failing tests related to that fault. In this example, this is the only
fault in MY_LIST.
Figure 2. The faults detected during
testing.
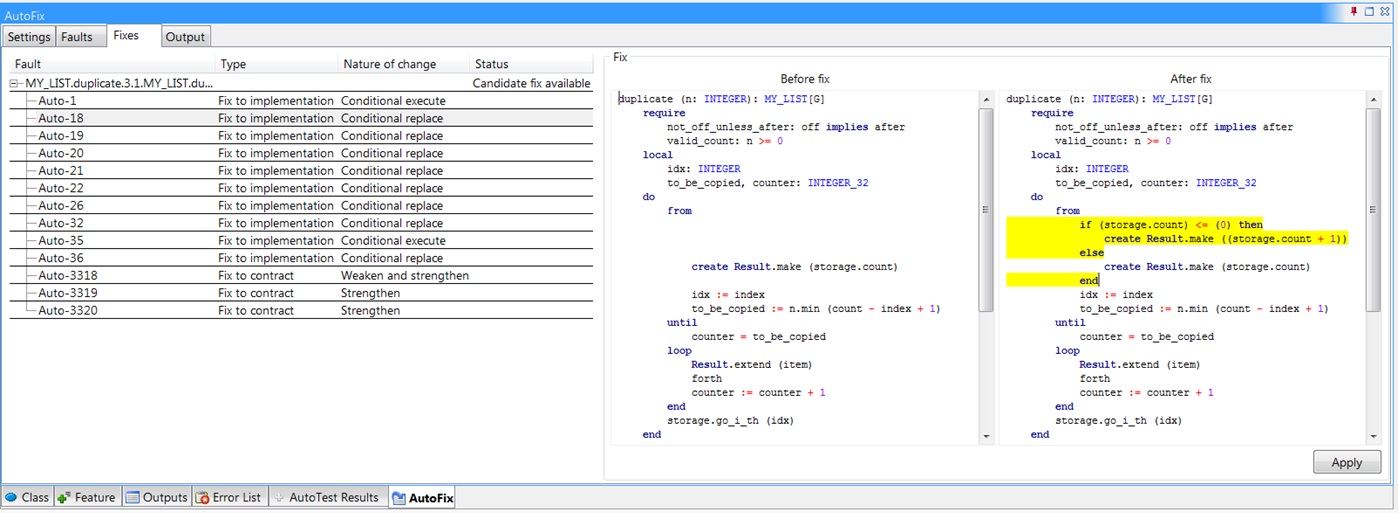
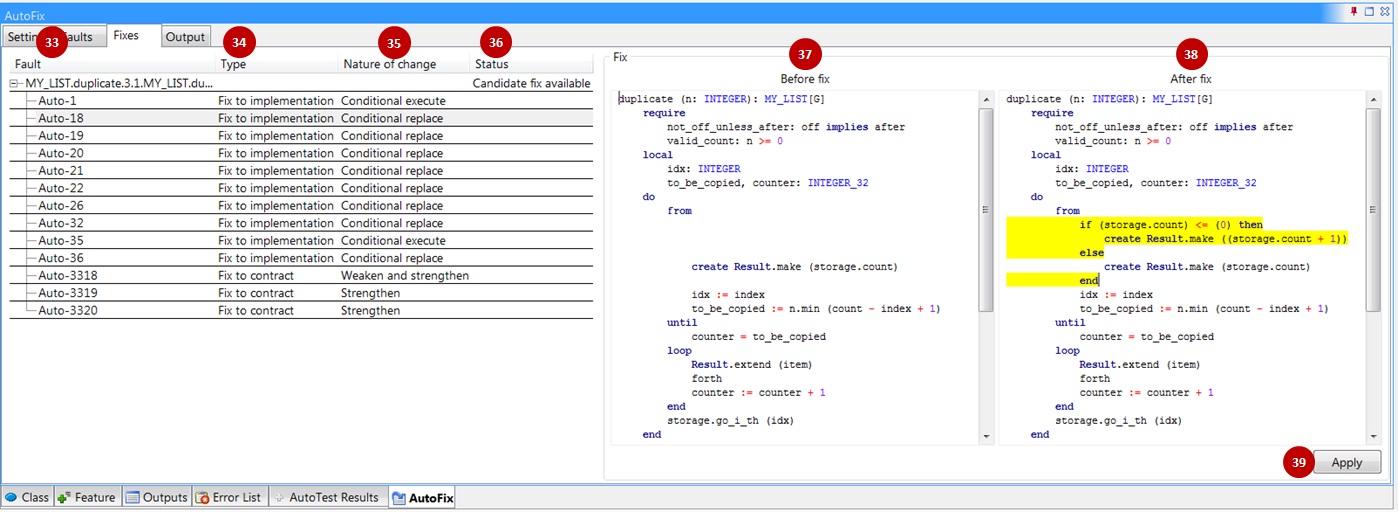
- Once testing is finished, AutoFix starts fixing the detected fault(s).
Whenever a valid fix is found, that fix is reported to the user on the Fixes
panel. Here the fix may suggest to change the implementation of a
feature (i.e. of type Fix to implementation), or to
change the contract of a few features (i.e. of type Fix to
contract). When a fix is selected, the detailed information
--- particularly the fix text and the program text it changes --- about
the fix is shown on the right side of the panel, with the changes to the
program being highlighted. For example, Figure 3 shows that the fix
(with ID Auto-18) to the above-mentioned fault changes the
implementation and executes
create Result.make ((0 + 1)),
instead of the original instruction, when (storage.count) <=
(0) holds.
Figure 3. The fixes proposed to the
fault.
Note: Fix Auto-18 is
semantically equivalent to the fix in Listing 2(a), as storage.count
can never be negative.
- When fixing is finished, you may go through each of the generated
valid fixes and inspect if any of them actually fixes the original fault
and introduces no new fault. When yes, you can select the fix, then
click on Apply to change the code accordingly and
therefore correct the fault. Applying a fix will also change the status
of the fix to Applied, and the status of the
associated fault to Candidate fix applied. In this
example, we can apply the fix Auto-18 to correct the fault.
Note: For the moment, only fixes to the implementation
can be applied automatically. In case of fixes to the contract,
distributing their required changes across the ancestors of a class is a
challenging task, and remains, however, as a manual effort: Applying
a fix to the contract only alters the statuses of the fix and the fault,
while the actual changes to the program have to be made by the
programmer.
In case AutoFix is not able to generate any valid/proper fix to a fault, you
can first manually correct the fault, then mark the fault as being Manually
fixed by selecting the fault on the Faults
panel and then clicking on Mark as manually fixed.
When all the faults detected in an AutoFix session have been fixed, you can
start another session of AutoFixing again, possibly with longer testing
sub-sessions: starting a new session will clear all the testing and fixing
results from the previous session. In this example, as the only fault in
class MY_LIST is now corrected by fix Auto-18, another
debugging session will not find any new fault in the class, increasing our
confidence in the correctness of the class.
The functionalities of AutoFix have been organized into four panels: the
Setting panel enables the user to configure the tool easily; the
Faults panel provides a central view of all the detected faults; the Fixes
panel serves as an overview of all the automatically suggested valid fixes
from AutoFix; the Output view reports on the progress of the AutoFixing
process. The rest of this section gives a detailed description of
the AutoFix panels from a user's perspective.
In this section, we use circled numbers on screenshots to designate specific
GUI elements on AutoFix panels, and we refer to such GUI elements using
notations like M-XX. For example, M-1 refers to the text field on the
Settings panel, where the groups of classes to be AutoFixed should be input.
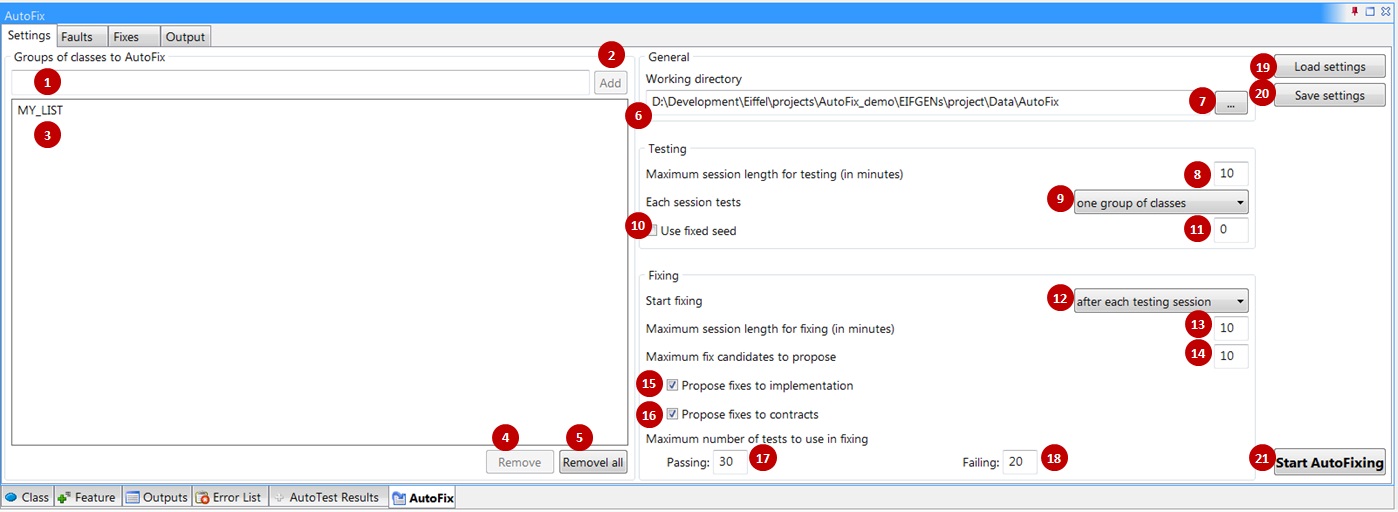
The behavior of AutoFix is configurable through a group of settings in a
configuration file, and the settings panel (Figure 4) provides a means for
the user to access and modify these settings easily. Here we will go
through all the AutoFix settings and explain their meanings and/or
restrictions on their values.
1. Groups of classes to AutoFix. Some classes can be
tested more thoroughly if they are tested together, e.g. when their
interfaces strongly depend on each other. Such classes can be passed on to
AutoFix as a group. To do so, you need to input the names of the classes
from the group, separated using comma, into M-1, and click on M-2. These
classes will then appear as a group in M-3. To remove a group of classes,
first select the group in M-3 and then click on M-4; to remove all groups
of classes, click on M-5.
Note:
- Groups of classes do not need to disjoint with each other.
2. Working directory. This is where all the
intermediate files and results will be stored during AutoFixing. By
default, AutoFix will use %EIFGENs%\%target_name%\Data\AutoFix as the
working directory. To choose a different working directory, either input
directly the path to the directory into M-6, or click on M-7 and browse
for a directory on your disk.
Note:
- Results from AutoFixing will be lost after changing to a new working
directory.
- Sub-directories of your project folder, except for the ones inside the
%EIFGENs% directory, should be avoided when choosing the working
directory. This is because AutoFix creates a copy of your project in the
working directory during fixing, and this copy will cause errors when
compiling the original project, if it is also included in the original
project.
3. Maximum session length for testing (in minutes). The
length, given in M-8, must be a positive integer.
4. What to test in each session? This setting takes one
of the three possible values listed in M-9: one class, one group of
classes, or all classes.
5. Use fixed seed. The AutoTest tool exercises random
testing: it uses a seed to generate a sequence of random numbers to
controls how testing proceeds. By default, AutoTest uses a new seed for
each testing session and therefore produces different testing results
for different sessions, which in turn leads to different fixing processes
in the context of AutoFixing. When reproducible fixing sessions are
desirable, you can use a fixed seed for AutoTest by selecting M-10 and
then providing an integer in M-11.
6. When to start fixing? This setting takes one of the
three possible values listed in M-12: after each testing session, after
all testing sessions, or manually.
7. Maximum session length for fixing (in minutes). The
length, given in M-13, must be a non-negative integer. Value 0 means no
timeout is set for fixing sessions.
8. Maximum fix candidates to propose. The number, given
in M-14, must be a positive integer. Fixes to implementation or to
contracts will be proposed if options are selected at M-15 and M-16,
respectively.
9. Maximum number of tests to use in fixing. The
numbers given in M-17 and M-18 must be non-negative integers. Value 0
means all available tests will be used in fixing.
The settings on the panel can be loaded from a file or saved to the disk
by clicking on M-19 or M-20, respectively. To start AutoFixing, or to stop
AutoFixing when it is running, click on M-21.
Figure 4. The Settings panel.
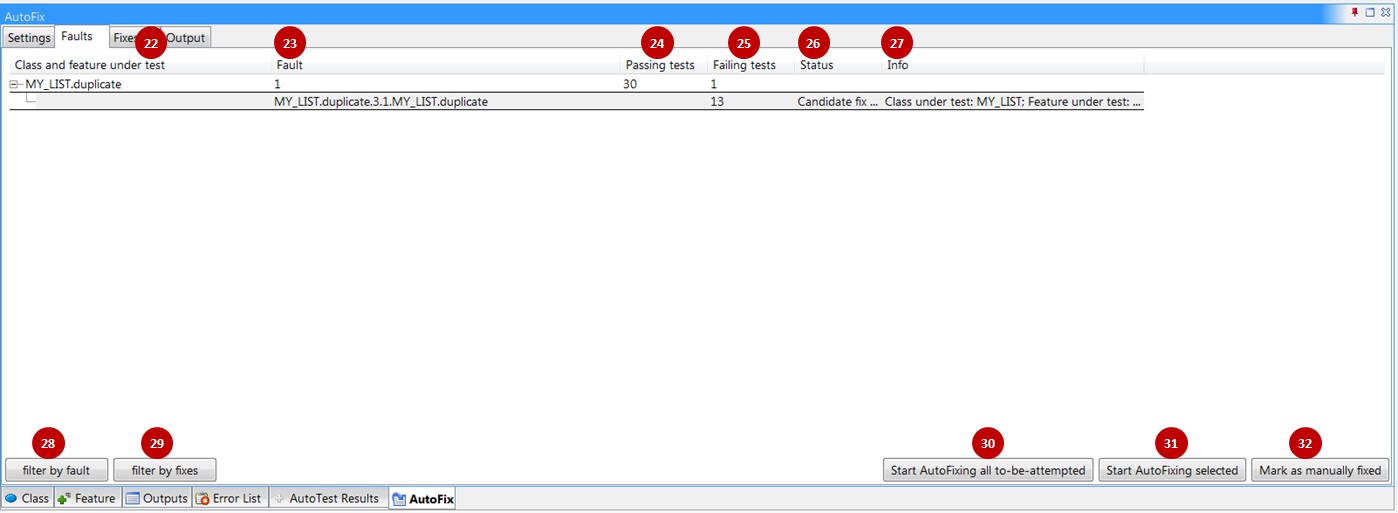
During testing, all the detected faults are listed on the Faults panel
(Figure 5) For each fault, detailed information, including the class and
feature under test when it was detected (M-22), its ID (M-23), the numbers
of passing and failing tests associated with it (M-24 and M-25), whether
it can be automatically fixed (M-26), and the other info (M-27), is shown.
When a fault has candidate fixes available, double clicking on the row of
the fault will bring you to the corresponding row on the Fixes panel,
under which all its candidate fixes are listed.
By clicking on M-28 and M-29 on the bottom of this panel, you can choose
the faults to show or not using predefined filters regarding the faults
themselves or their fixes, respectively. You can also continue fixing all
the detected faults that haven't been attempted by AutoFix yet by clicking
on M-30, starting AutoFixing the selected fault by clicking on M-31, or
mark the selected fault as being manually fixed by clicking on M-32.
Note:
- M-30 is only clickable when there is at least one not-yet-attempted
fault, while M-31 and M-32 are only clickable when the currently
selected fault is not fixed yet.
Figure 5. The Faults panel.
During fixing, when a valid candidate fix is found regarding a fault, the
fault and the fix are added to the Fixes panel (Figure
6)
On this panel, all the valid fixes found so far are listed by their
targeting faults (M-33). Each fix can be of one of the three types (M-34):
Fix to implementation, Fix to contract, or Manual fix; each type of fix
may introduce changes of different nature to the code (M-35).
Particularly, a fix to implementation may change the program to
conditionally execute some instructions, to conditionally replace some
instructions with one instruction, or to conditionally/unconditionally add
an instruction; a fix to contract may modify the existing contract by
weakening it, strengthening it, or weakening it in one aspect and at the
same time strengthening it in another aspect; while a manual fix may
involve arbitrarily complicated changes to the code.
To view the detailed changes defined by a fix, select the fix, then the
relevant parts of the code, both before and after the fix has been
applied, will be displayed on the right side of the panel (M-37 and M38).
The differences are highlighted for better readability.
The proposed valid fixes are meant to be inspected before applied to the
program, to ensure that only proper fixes get into the program. When you
decide that a candidate fix is proper and you want to apply its changes to
the code, you just need to select that fix and then click on M-39.
Note:
- Each feature in the program can only be automatically fixed once
in an AutoFix session. After the first automatic fix, the feature
text is changed, so all the following fixes to the same feature need to
be applied manually due to the potential risk of overwriting previous
fixes.
Figure 6. The Fixes panel.
The
intermediate output of AutoFix is directed to the read-only Output panel.
Such output is helpful for the advanced users to understand the internal
progress of the tool, but it is not meant to be referred to in regular
uses.
AutoFix is distributed under the terms of the GNU General Public License.
There is absolutely NO WARRANTY for AutoFix, its code and its
documentation.

